As I write this on Friday, October 30, the photography kit I’m taking is still a bit up in the air. I violated one of the cardinal rules of travel photography: I bought a new camera 10 days before leaving on a major trip. This is foolish: you don’t have time to learn how to efficiently use the camera, and new cameras can suffer from “infant mortality” – they are more likely to fail immediately after they are put in service, when manufacturing flaws get exposed for the first time. To compound the foolishness, this is a brand new camera model; mine arrived on the first day they were available in the U.S.

Nikon Zf, October 13 2023
Yet here we are.
So here’s the core kit:
- Nikon Zf, a “full frame” 24.5 megapixel camera
- Nikon Nikkor S 24-70 f/4 mid-range zoom lens
- Nikon Nikkor 40 f/2 lens
- 1 extra battery and a charger (you can also charge the battery in the camera via USB-C)
- 6-8 SD memory cards, 64GB each (I probably need no more than 2 of these)
- 2 microSD memory cards, 128GB each (these are for backup which takes place in the camera with each shot)
- 72mm circular polarizer filter for the zoom lens (cuts glare, just like your polarized sunglasses)
- Shoulder straps and a wrist strap
- Samsung 1TB SSD (to make another backup copy of the images as we go)
- A couple of USB-C cables for charging and connecting the camera to my iPad
- An SD card reader, also to load images into my iPad
- A small table-top tripod useful for self portraits and night photography)
- iPhone 14 Pro, my backup and pocket camera
That stuff will fit in a small shoulder bag which I can carry with me on the plane, with some of the accessories (straps, tripod, etc.) going in my checked luggage.

Small shoulder bag and backpack, October 2023
Now the uncertain part. On every trip I’ve taken since 2011, I’ve carried a second camera for backup. This started as a simple Canon pocket sized point and shoot in 2011, and evolved into a pair of Olympus (or Panasonic) bodies by 2013. The advantage of using the two bodies is that they can share the lenses and other accessories (although never batteries!), which makes the decision easy. My current “second” Olympus body, and E-M5.3, weighs only 15 oz. and is quite small. Today I find myself with a single Nikon body, and so bringing even that small Olympus as a backup means also bringing one or more lenses, batteries, and a charger. At a minimum, this would add about 2 lbs. and also push me to carrying a small camera backpack instead of the shoulder bag.
To further complicate the issue, that small backup kit would merely duplicate the capabilities (more or less) of the primary kit. I have a drawer full of lenses for the Olympus; it seems a shame not to add another 13 oz. or so and have another lens to give me even more flexibility. But then I’d need to carry both the Nikon and Olympus gear around with me while sightseeing, which was never the point.
What to do? I’ll update this page when we’re actually on the way with the final answer.
Update – October 26, 2023
So I took the small bag shown above, and also another smaller case with my very small Olympus E-M5 and the 17/1.8 lens inside my backpack. I doubt I’ll use it unless I develop a problem using the Nikon Zf.
Here are some thoughts after 1.5 days and a couple of hundred images.
- The camera focuses really quickly and seems accurate. That being said, I’ve only been using a single, centered focus point and AF-C (continuous auto-focus). I tried other modes before we left, but this is the proper mode for sightseeing.
- The battery see life is much better than I expected. The Olympus batteries were limited by the number hours that the the cameras was on – up to two or so hours, so I always turned the camera off between shots. The Nikon seems to have a much more effectively sleep mode, so that after being out for about six hours and taking ~120 shots, I only used about 1/3 of the battery. The camera was turned on for at least half of that time. Also, the camera wakes up from sleep mode almost instantly by touching the shutter release.
- I had a great deal of trouble understanding the ISO dial. It turns out it is modal – it does different things in different modes. If Auto ISO is OFF, then the dial allows you to set the ISO. If Auto ISO is ON, then the dial allows you to set the minimum ISO which is set in the Auto ISO menu. This allows you to control the shutter speed the camera will choose if shooting in Aperture priority mode, and raise it if the camera is choosing too slow a shutter for the situation. Once you understand what it does, it works very well.
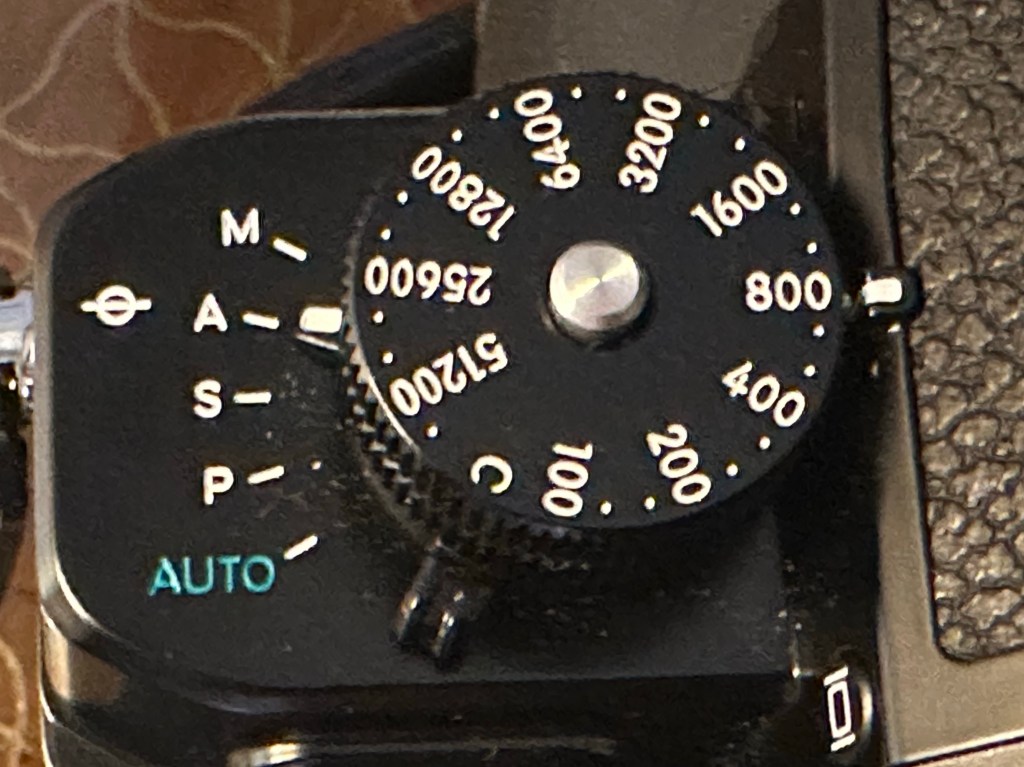
- Unfortunately, when turning the ISO dial, it is too easy to move the Mode switch (this switch is a lever stacked under the ISO dial). For me, it seems to move from Aperture (my usual mode) to Manual. If you don’t know this happened, then your exposure will be wrong. It probably moves in other situations also.
- I was concerned about carrying the camera in my hand for long periods of time; it’s a bit heavier than my E-M1 Mark III, and has only a vestigial hand grip. It turned out to be pretty good, at least with the two lenses I have now: the 40/2 and 24-70/4. With a heavier lens, it will be worse, of course. But I carried it for six hours today (with breaks) and had no problem. I will buy the accessory handgrip when we get back from the trip.
- With my eyeglasses, I can’t see the entire EVF image. Even without glasses (the diopter adjustment is effective), it’s marginal. This also means I can’t easily see if the Mode dial has been accidentally moved (see above). I’m not sure what to do about this.
- Compared with my E-M1 Mark III, this camera has significantly fewer programmable buttons. I thought this would be a problem, but between the I button quick menu and MyMenu, along with the available programmable buttons, it seems okay so far.
- Every camera I’ve owned since my D7000 a hundred years ago has had “user” modes selectable from the mode dial. With the E-M1 Mark III, the customization possible with the three User modes was extensive. It meant you could significantly reconfigure the camera to different scenarios by literally twisting a dial. The Nikon Zf has none of these.
- The Olympus has a separate programmable two position lever that I set to switch between two different sets of custom focus settings. I used it to switch between AF-S (single focus for most shooting) with back button focus, and AF-C (where continuous focusing is needed) with shutter button focus. On the Olympus you want to use AF-S whenever possible as it is more accurate. On the Nikon, AF-C is remarkably effective in many situations and I find I can often just leave it in this mode. So part of the need for the focus mode lever is reduced.
